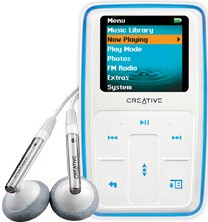
Zen MicroPhoto - Product Guide

Technical Specifications
Capacity: 4GB and 8GB
Dimensions: 51 x 83 x 17.2 mm (WxHxD)
Weight: 115 g (with battery)
Display`1.5", 262,144 color OLED Display
Song Capacity: 4,000 WMAs/ 266 hours (at 64 kbps)2,000 MP3/
133hours (at 128 kbps)
SNR for MP3 playback: 96 dB
FM Signal-to-noise ratio up to 46dB
Battery Life Playtime: Up to 15 hours
System requirements
Microsoft® Windows® XP (Service Pack 1 or higher) / XP 64-bit
Intel® Pentium® II 350 MHz or AMD K6-2® 450 MHz (Pentium III 450
MHz or higher recommended for MP3 encoding)
64MB RAM (128MB recommended)
USB 1.1 port (USB 2.0 recommended for faster transfer)
170MB free hard drive space (more for audio content storage)
CD-ROM drive with digital audio extraction support
Package contents
1 x Zen MicroPhoto
1 x High fidelity Creative earphones with dynamic bass response
1 x Removable rechargeable Li-ion battery
1 x USB 2.0 Cable
1 x Pouch
1 x Installation CD
1 x Quick Start Guide

Warning: DO NOT connect your player to your computer
before setting up the software.
- DO NOT connect your player to your computer before
setting up the software.
- Turn on your computer.You must log in as an administrator in
Windows®, before you can set up the software. For more
information, refer to your operating system's online Help.
- Insert the Installation and Applications CD into your
CD-ROM/DVD-ROM drive. Your CD should start automatically. If it
does not, follow the steps below.
- Start Windows Explorer. On the left pane, click the My
Computer icon. Right-click the CD-ROM/DVD-ROM drive icon, and
then click AutoPlay.
- Follow the instructions on the screen to complete the
installation.
- If prompted, restart your computer.
- When your computer restarts, follow the product registration
instructions on the screen.Note that you require an Internet
connection to register your product.
- When prompted, connect your player to your computer's USB port
using the supplied USB cable.
- Connect your player to your computer’s USB port with the
supplied USB cable.
- When the battery is charging, the battery charging icon
 flashes on the Organic Light Emitting Diode (OLED)
display. flashes on the Organic Light Emitting Diode (OLED)
display.
- Disconnect your player from your computer when the battery is
fully charged and you see
 on your player’s OLED display. Fully charging your
player takes approximately five hours. If your fully charged
player remains connected to your computer for a prolonged period,
the OLED display blanks out automatically to save battery power. on your player’s OLED display. Fully charging your
player takes approximately five hours. If your fully charged
player remains connected to your computer for a prolonged period,
the OLED display blanks out automatically to save battery power.
To remove the driver of your Creative product click on Start,
Control Panel, double click Add/Remove Programs ,
select the driver entry and press the Add/Remove button.
Repeat this step to remove the software entries of your Creative
product.
Creative neither recommend nor support
manually editing the Windows registry!
- Close all Zen MicroPhoto applications. Applications
that are still running during the uninstallation will not be
removed.
- Unplug the device from the PC.
- Go to Control Panel, Add/ Remove Programs and
highlight the Zen MicroPhoto entry and click
Add/Remove.
- Follow the onscreen prompt to uninstall the software.
- If prompted restart your computer.
Note |
- If your Zen MicroPhoto package included a
PlaysForSure leaflet advising to download
compatible firmware from www.creative.com, please disregard
this. This was erroneously included in early shipments. The
Zen MicroPhoto is fully PlaysForSure compatible out of the
box.
| |
 |
| Did this
information answer your question? |
 |
 |
|