 Removing the Chassis Intrusion Switch
Dell™ OptiPlex™ GX270 Service Manual
Removing the Chassis Intrusion Switch
Replacing the Chassis Intrusion Switch
Resetting the Chassis Intrusion Detector

|
CAUTION: Before you begin any of the procedures in this section, follow the steps in "Safety Instructions." |
 |
NOTICE: Before you disconnect a device from the computer or remove a component from the system board, verify that the standby power light on the system board has turned off. To locate the light, see "System Board." |
|
NOTICE: To disconnect a network cable, first unplug the cable from your computer and then unplug it from the network wall jack. |
|
|
CAUTION: To guard against electrical shock, always unplug your computer from the electrical outlet before opening the cover. |
|
NOTICE: Before touching anything inside your computer, ground yourself by touching an unpainted metal surface, such as the metal at the back of the computer. While you work, periodically touch an unpainted metal surface to dissipate any static electricity that could harm internal components. |
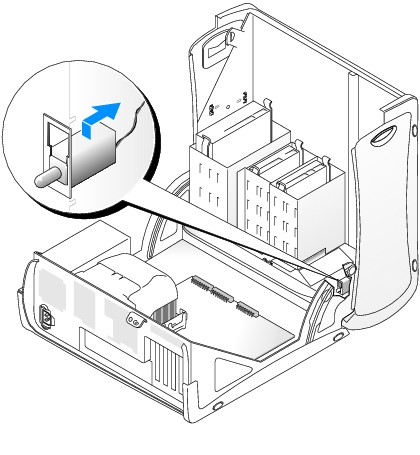
Note the routing of the chassis intrusion cable as you remove it from the chassis. Chassis hooks may hold the cable in place inside the chassis.


Small Mini-Tower Computer
|
NOTICE: To connect a network cable, first plug the cable into the network wall jack and then plug it into the computer. |
 |
NOTE: For instructions on using system setup, see the User's Guide. |
|
NOTE: The default is Enabled-Silent. |
|
NOTE: If a setup password has been assigned by someone else, contact the network administrator for information on resetting the chassis intrusion detector. |