Back to Contents Page
Control Panel
Dell™ OptiPlex™ GX270 Service Manual
 Removing the Control Panel
Replacing the Control Panel

|
CAUTION: Before you begin any of the procedures in this section, follow the steps in "Safety Instructions." |
 |
NOTICE: Before you disconnect a device from the computer or remove a component from the
system board, verify that the standby power light on the system board has turned off. To locate
the light, see "System Board."
|
- Shut down the computer through the Start menu.
- Ensure that your computer and attached devices are turned off. If your computer and
attached devices did not automatically turn off when you shut down your computer,
turn them off now.
|
NOTICE: To disconnect a network cable, first unplug the cable from your computer and then
unplug it from the network wall jack.
|
- Disconnect any telephone or telecommunication lines from the computer.
- Disconnect your computer and all attached devices from their electrical outlets, and
press the power button to ground the system board.
- Remove the computer stand, if it is attached.
|
|
CAUTION: To guard against electrical shock, always unplug your computer from the electrical outlet before opening the cover. |
- Open the computer cover.
|
NOTICE: Before touching anything inside your computer, ground yourself by touching an
unpainted metal surface, such as the metal at the back of the computer. While you work,
periodically touch an unpainted metal surface to dissipate any static electricity that could harm
internal components.
|
Removing the Control Panel
Small Form-Factor Computer
- Using a flat-blade screwdriver, release the four tabs from the inside of the computer,
and remove the computer cover from the computer.
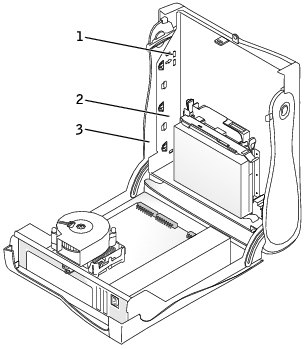
1 | tabs (2 on each side) |
2 | computer |
3 | computer cover |
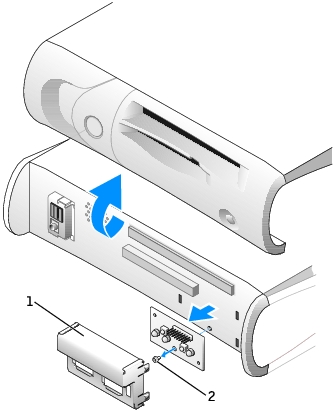
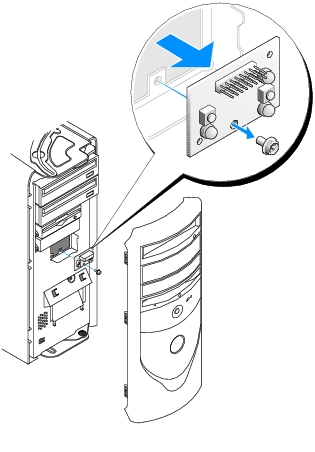
1 | metal control-panel shield |
2 | screw |
- Remove the metal control-panel shield.
- Remove the screw that holds the control panel to the computer, and remove the
control panel.
Small Desktop Computer
- Remove the front I/O panel (see I/O Panel).
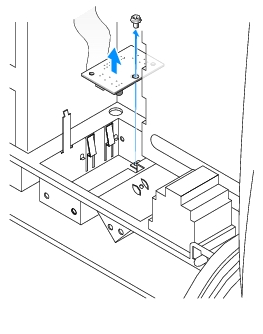
- Using an 8-inch #2 Phillips screwdriver, remove the screw that secures the control
panel to the computer, and lift the panel away from the computer.
Small Mini-Tower Computer
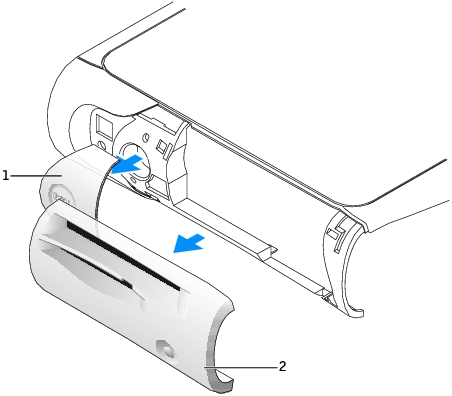
- To remove the top and bottom panels of the computer, remove any installed CD drives
and release all the tabs on each panel.
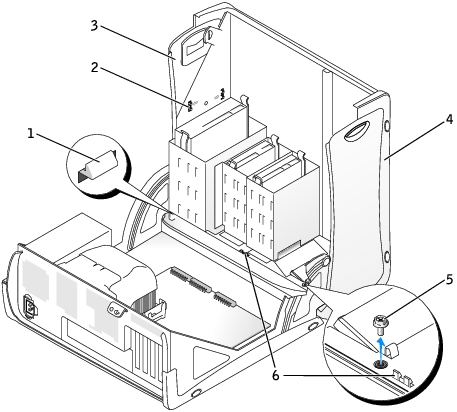
1 | computer cover tab (remove the CD drive to access this tab) | 4 | bottom panel |
2 | top-panel tabs | 5 | computer cover screw |
3 | top panel | 6 | computer cover tabs (2) |
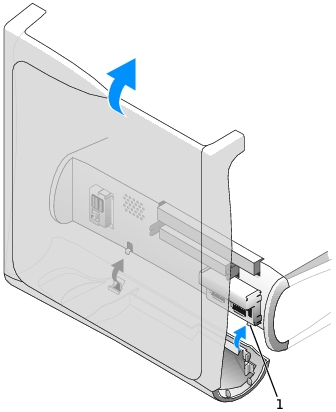
- To prepare the computer cover for removal, release the three computer cover tabs (one
tab is located by the CD drive and two tabs are located by the I/O panel).
 |
NOTE: To release the tab located by the CD drive, you can pry the computer cover away from
the computer and pull out the tab.
|
- If necessary, remove the computer cover screw.
- Close the computer and remove the computer cover.
- Remove the screw that secures the control panel to the computer, and pull the control
panel away from the computer.
Replacing the Control Panel
Small Form-Factor Computer
- Replace the control panel and the control-panel shield.
- Replace the computer cover. Ensure that the two metal hooks and tabs are securely in
position.
To help replace the computer cover, remove the accent door and front mask from the computer cover:
- Remove the front mask by releasing the tabs on the inside of the computer cover.
- Remove the accent door by pressing the middle of the door while you lift away the
sides of the door.
- Replace the computer cover and ensure that the two metal hooks and tabs are securely
in position.
- To replace the front mask and accent door, press them into position.
Small Desktop Computer
Follow the steps in the "Removing the Control Panel" procedure in the reverse order, ensuring that all tabs are secure.
Small Mini-Tower Computer
Follow the steps in the "Removing the Control Panel" procedure in the reverse order, ensuring that all tabs are secure.
Back to Contents Page